Building Language Model and Text Generation using Recurrent Neural Networks

With the lastest developments and improvements in field of Deep Learning and Artificial Intelligence, many axacting task of Natural Language Processing are becoming facile to implement and execute. Text Generation is one such task which can be architectured using Deep Learning models, particulary Recurrent Neural Networks. An example of text generation is recently released Harry Potter chapter which was generated by Artificial Intelligence.
Text Generation is a type of Language Modelling problem. Language Model is the core problem for a number of natural language processing tasks such as speech to text, conversation system, and text summarization. A trained language model learns the likelihood of occurrence of a word based-on the previous sequence of words used in the text. Language models can be operated at character level, n-gram level, sentence level, or even paragraph level.
In this post, I wil present how to create a language model for generating natural language text by implement and training Recurrent Neural Network. I use Python programming language and library Pytorch for this purpose. The objective of this model is to generate new text, given that some input text is present. In this project, we’ll generate ous own Seinfeld TV scripts using RNNs. We’ll be using part of the Seinfeld dataset of scripts from 9 seasons. The Neural Network we’ll build will generate a new ,”fake” TV script, based on patterns it recognizes in this training data. There will be three main parts: dataset preparation, model training, and generating prediction through 7 steps.
Lets start building the problem.
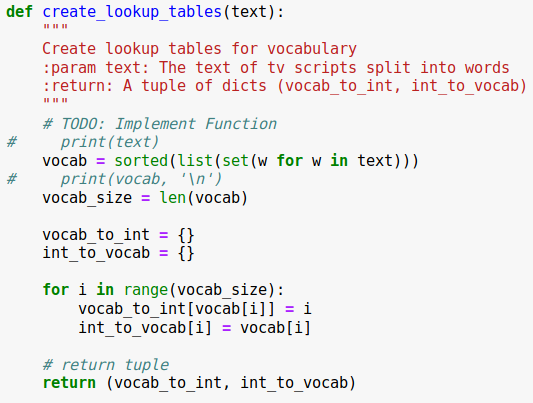
Step 1: Create the lookup tables function
For this step, we will implement the create_lookup_tables function. We are given the TV scripts, which have been split into words as the function’s parameter. Function need to return a tuple of our distionarys.
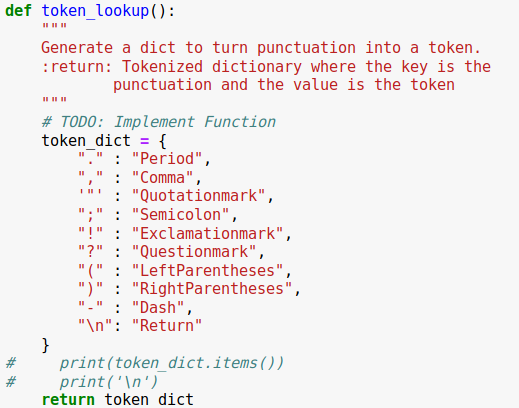
Step 2: Create the Token Lookup Function
For this step, our task is to implement the token_lookup function. We have a list of 10 tokens; we need to return a dictionary where the symbol is the key and the value is the token.
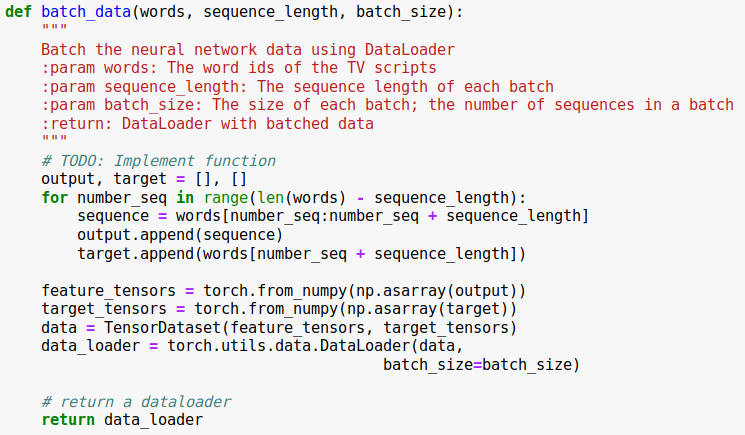
Step 3 : Create the Batch Data Function
For this step, our task is to implement the batch_data function. We are given the word ids of the TV scripts, the sequence length of each batch, and the size of each batch, which is the number of sequences in a batch; we need to return a PyTorch Data Loader with the batched data.
For example, we have these as input:
words = [1, 2, 3, 4, 5, 6, 7]
sequence_length = 4
First feature_tensor contain the values:
[1, 2, 3, 4]
And the corresponding target_tensor just be the next “word”/ tokenized word value:
5
This continue with the second feature_tensor, target_tensor being:
[2, 3, 4, 5] # features
6 # target
Before continuing on to the next step to build an Recurrent Neural Networks model, we learn about the overview of Recurrent Neural Networks.
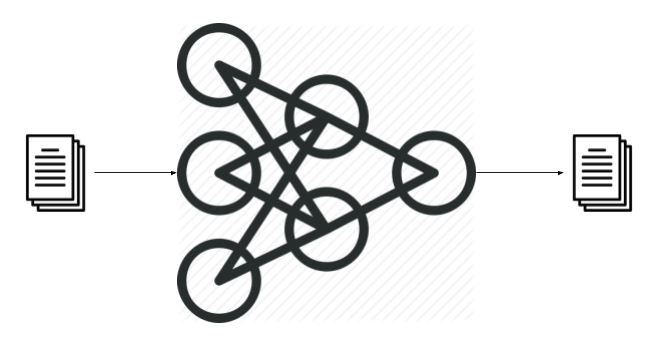
Recurrent Neural Netowks (RNNs)
Unlike Feed-forward neural networks in which activation outputs are propagated only in one direction, the activation outputs from neurons propagate in both directions (from inputs to outputs and from outputs to inputs) in Recurrent Neural Networks. This creates loops in the neural network architecture which acts as a ‘memory state’ of the neurons. This state allows the neurons an ability to remember what have been learned so far.
The memory state in RNNs gives an advantage over traditional neural networks but a problem called Vanishing Gradient is associated with them. In this problem, while learning with a large number of layers, it becomes really hard for the network to learn and tune the parameters of the earlier layers. To address this problem, A new type of RNNs called LSTMs (Long Short Term Memory) Models have been developed.
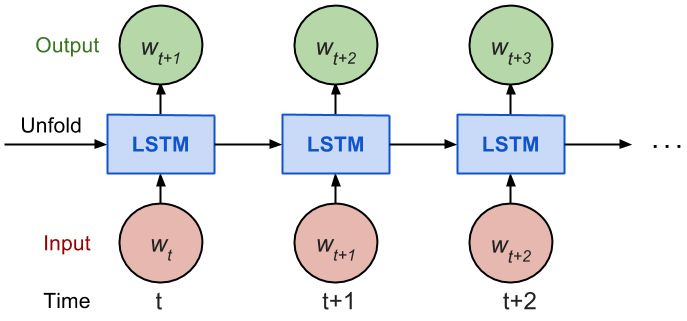
LSTMs have an additional state called ‘cell state’ through which the network makes adjustments in the information flow. The advantage of this state is that the model can remember or forget the leanings more selectively.
Step 4: Build the Recurrent Neural Networks (RNNs)
To implement, we may choose to use a GRU or LSTM. We’ll have to implement the following functions:
__init__: The initialize function.forward: The initialization function for an LSTM/GRU hidden stateinit_hidden: Forward propagation function.
The initialize function should create the layers of the neural network. The forward propagation function will use these layers to run forward propagation and generate an output and a hidden state.
class RNN(nn.Module):
   def __init__(self, vocab_size, output_size, embedding_dim, hidden_dim, n_layers, dropout=0.5):
       """
       Initialize the PyTorch RNN Module
       :param vocab_size: The number of input dimensions of the neural network (the size of the vocabulary)
       :param output_size: The number of output dimensions of the neural network
       :param embedding_dim: The size of embeddings, should you choose to use them
       :param hidden_dim: The size of the hidden layer outputs
       :param dropout: dropout to add in between LSTM/GRU layers
       """
       super(RNN, self).__init__()
       # TODO: Implement function

       # set class variables
       self.vocab_size = vocab_size
       self.output_size = output_size
       self.embedding_dim = embedding_dim
       self.hidden_dim = hidden_dim
       self.n_layers = n_layers

       # define model layers
       self.embedding = nn.Embedding(vocab_size, embedding_dim)
       self.lstm = nn.LSTM(embedding_dim, hidden_dim, n_layers,
                        dropout=dropout, batch_first=True)
       self.dropout = nn.Dropout(0.3)
       self.fc = nn.Linear(hidden_dim, output_size)
       self.sig = nn.Sigmoid()

   def forward(self, nn_input, hidden):
       """
       Forward propagation of the neural network
       :param nn_input: The input to the neural network
       :param hidden: The hidden state
       :return: Two Tensors, the output of the neural network and the latest hidden state
       """
       # TODO: Implement function
       batch_size = nn_input.size(0)
       x = nn_input.long()
       embeds = self.embedding(nn_input)
       lstm_out, hidden = self.lstm(embeds, hidden)
       lstm_out = lstm_out.contiguous().view(-1, self.hidden_dim)
       out = self.dropout(lstm_out)
       out = self.fc(out)
       sig_out = self.sig(out)
       sig_out = out.view(batch_size, -1, self.output_size)
       sig_out = sig_out[:, -1]

       # return one batch of output word scores and the hidden state
       return sig_out, hidden


   def init_hidden(self, batch_size):
       '''
       Initialize the hidden state of an LSTM/GRU
       :param batch_size: The batch_size of the hidden state
       :return: hidden state of dims (n_layers, batch_size, hidden_dim)
       '''
       # Implement function
       weight = next(self.parameters()).data

       # initialize hidden state with zero weights, and move to GPU if available

       if (train_on_gpu):
           hidden = (weight.new(self.n_layers, batch_size,  self.hidden_dim).zero_().cuda(),
              weight.new(self.n_layers, batch_size, self.hidden_dim).zero_().cuda())
       else:
           hidden = (weight.new(self.n_layers, batch_size, self.hidden_dim).zero_(),
                  weight.new(self.n_layers, batch_size, self.hidden_dim).zero_())


       return hidden
Step 5: Define Forward and Backpropagation
Use the RNN class you implemented to apply forward and back propagation. This function will be called, iteratively, in the training loop as follows:
loss = forward_back_prop(decoder, decoder_optimizer, criterion, inp, target)
And it should return the average loss over a batch and the hidden state returned by a call to RNN(inp, hidden). Recall that we can get this loss by computing it, as usual, and calling loss.item().
* If a GPU is available, you should move your data to that GPU device, here.
def forward_back_prop(rnn, optimizer, criterion, inp, target, hidden):
   """
   Forward and backward propagation on the neural network
   :param rnn: The PyTorch Module that holds the neural network
   :param optimizer: The PyTorch optimizer for the neural network
   :param criterion: The PyTorch loss function
   :param inp: A batch of input to the neural network
   :param target: The target output for the batch of input
   :return: The loss and the latest hidden state Tensor
   # TODO: Implement Function

   # move data to GPU, if available
   if train_on_gpu:
       inp, target = inp.cuda(), target.cuda()

   # perform backpropagation and optimization
   hidden = tuple([each.data for each in hidden])
   rnn.zero_grad()
   output, hidden = rnn(inp, hidden)
   loss = criterion(output, target)
   loss.backward()
   optimizer.step()

   # return the loss over a batch and the hidden state produced by our model
   return loss.item(), hidden
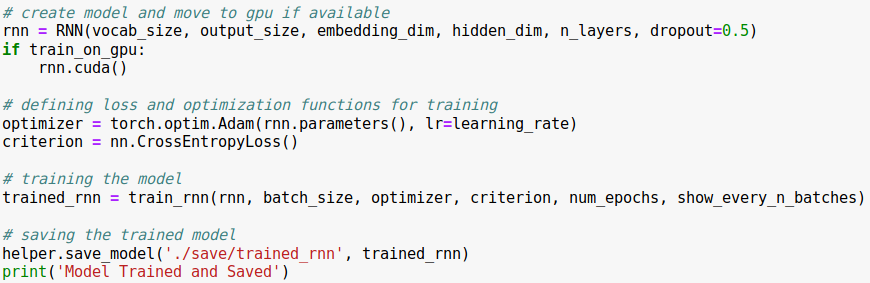
Step 6: Training model, Set and Document Hyperparameters
Step 7: Generate Text
Great, our model is now ready and we can train it using our data. Next lets write the function to predict the next word based on the input words (or seed text). We will first tokenize the seed text, pad the sequences and pass into the trained model to get predicted word. The multiple predicted words can be appended together to get predicted sequence.
To continue running, we need to reload the model
import torch
import helper
import problem_unittests as tests

# To continue running, we need to reload the model
_, vocab_to_int, int_to_vocab, token_dict = helper.load_preprocess()
trained_rnn = helper.load_model('./save/trained_rnn')

def generate(rnn, prime_id, int_to_vocab, token_dict, pad_value, predict_len=100):
   """
   Generate text using the neural network
   :param decoder: The PyTorch Module that holds the trained neural network
   :param prime_id: The word id to start the first prediction
   :param int_to_vocab: Dict of word id keys to word values
   :param token_dict: Dict of puncuation tokens keys to puncuation values
   :param pad_value: The value used to pad a sequence
   :param predict_len: The length of text to generate
   :return: The generated text
   """
   rnn.eval()
   # create a sequence (batch_size=1) with the prime_id
   current_seq = np.full((1, sequence_length), pad_value)
   current_seq[-1][-1] = prime_id
   predicted = [int_to_vocab[prime_id]]

   for _ in range(predict_len):
       if train_on_gpu:
           current_seq = torch.LongTensor(current_seq).cuda()
       else:
           current_seq = torch.LongTensor(current_seq)

       # initialize the hidden state
       hidden = rnn.init_hidden(current_seq.size(0))

       # get the output of the rnn
       output, _ = rnn(current_seq, hidden)

       # get the next word probabilities
       p = F.softmax(output, dim=1).data
       if(train_on_gpu):
           p = p.cpu() # move to cpu

       # use top_k sampling to get the index of the next word
       top_k = 5
       p, top_i = p.topk(top_k)
       top_i = top_i.numpy().squeeze()

       # select the likely next word index with some element of randomness
       p = p.numpy().squeeze()
       word_i = np.random.choice(top_i, p=p/p.sum())

       # retrieve that word from the dictionary
       word = int_to_vocab[word_i]
       predicted.append(word)

       # the generated word becomes the next "current sequence" and the cycle can continue
       current_seq = np.roll(current_seq.cpu(), -1, 1)
       current_seq[-1][-1] = word_i

   gen_sentences = ' '.join(predicted)

   # Replace punctuation tokens
   for key, token in token_dict.items():
       ending = ' ' if key in ['\n', '(', '"'] else ''
       gen_sentences = gen_sentences.replace(' ' + token.lower(), key)
   gen_sentences = gen_sentences.replace('\n ', '\n')
   gen_sentences = gen_sentences.replace('( ', '(')

   # return all the sentences
   return gen_sentences
As we can see, the model has produced the output which looks fairly fine. The results can be improved further by experimenting with following points:
- Adding more data
- Adding more LSTM layers
- Fine Tuning the network
- Running it for longer epoochs
You can find the complete code at this link.
You can take a look at a more detail explanations for RNN, LSTM in the following posts:
Recurrent Neural Networks — Part 1
Recurrent Neural Networks — Part 2